150ft Decorative Curbing Install in Cicero, IN — Full Project Walkthrough
Introduction: Turning a Yard into a Masterpiece
Installing 150 feet of decorative curbing is like laying the frame around a beautiful painting — it defines the space, protects the design, and brings the whole yard to life.
For this Cicero, IN homeowner, they were tired of their landscape beds constantly spilling into the lawn and edging that wouldn't stay in place. Although the landscape was already beautiful and well taken care of, they wanted something clean, bold, and permanent — without constant maintenance. Even the most beautiful yard can benefit from the addition of decorative curbing to enhance its overall appearance.
The solution? A single-day installation of 150 linear feet of gauntlet grey curbing, with the spanish roller for texture, and our H-stamp design to finish it off. In this blog post, we’ll walk you through every step of the job — from prep to pour to the final sweep — so you can see exactly what goes into a professional curbing installation.
Step 1: Pre-Job Planning — Measure Twice, Pour Once
Every smooth decorative concrete curbing install kicks off with a little thing we like to call preparation—because nobody wants a lumpy sidewalk or a curbing disaster. Take this recent job in a cozy suburban neighborhood of Cicero, Indiana. The site was mostly flat, with just a few gentle slopes to keep things interesting. The landscape itself was your classic traditional style, featuring curved beds and river rock—perfect territory for continuous curbing.
Once we scoped out the site, it was time for the design fun. After chatting through color and texture options, the homeowner settled on Gauntlet Grey for the color, a Spanish Roller texture with an H-stamp for some subtle flair, and, of course, the ever-popular slant-style edge. Our quote isn’t just a number tossed out there; it’s a custom-tailored masterpiece complete with a detailed mock-up, so you get a sneak peek of the final look before we even break ground. Plus, it breaks down every penny involved and notes all the little quirks specific to the job.
Next up: scheduling and setup. We picked a sunny day clocking in at a perfect 88º—because concrete loves a bit of warmth but definitely not a sauna session. I, however, did not handle the heat as well as the curbing. We ordered up 14 bags of Portland Cement, 2 yards of masonry sand, Grey coloring, and some Charcoal release powder (think of it as the icing on the cake to keep everything looking sharp). The crew prepped all the essentials: bed edger, curbing machine, concrete mixer, trowels, stamps, and sprayers. Rolling in with a lean but mighty two-person team, we were ready to turn this outdoor space from ordinary to wow.
So, whether you're planning your own curbing adventure or just nerding out on concrete logistics, remember: solid prep makes for smooth installs and happy homeowners. And hey, a little fun helps the cement go down easier, too.
Step 2: Site Prep — Setting the Stage
Before laying down decorative concrete curbing, we start by bidding farewell to the old metal edging—because let’s face it, even edging deserves a retirement plan. With the old border out of the way, we whip out the trusty bed edger to slice off about half an inch to an inch of grass right along the curb. This little haircut does more than just tidy up—it creates a perfectly clean, flat runway for the concrete to land smoothly and evenly. Plus, by setting the curb low enough, mowing around it later becomes less of a wrestling match and more of a casual stroll with your mower.
Next up, it’s all about playing connect-the-dots with layout and marking. We carefully eyeball and follow the edge of the existing landscaping, staying true to the natural lines already in place. It’s like drawing within the lines, but with a shovel and a lot more precision. This careful prep ensures the new concrete curbing seamlessly blends with what’s already growing, upgrading your outdoor space with style and a bit of finesse.
Step 3: Running the Curbing Machine
When it comes to decorative concrete curbing, the magic starts right at the mixing stage. Picture this: a stiff, peanut butter-thick blend of grey pigmented concrete. We nailed the perfect formula—16 ounces of pigment, one bag of Portland cement, and three buckets of masonry sand. Why peanut butter thick? Because consistency is king. Too soupy and the curb slumps like a tired toddler, too dry and it’s a nightmare to shape and texture. It’s a Goldilocks situation—just right is the goal.
Next up is the art of laying the curb, which is truly a two-person dance. One crew member takes on the role of the concrete maestro, mixing and carefully feeding the stiff concoction into the curbing machine with steady precision. Meanwhile, the second member guides the machine as if steering a delicate ship, then smoothing and troweling the edges between each batch to create a seamless finish. They work in 10 to 13-foot chunks, which might sound oddly specific, but this method keeps every curve crisp and under control—because nobody wants a wobbly curb that looks like a roller coaster track.
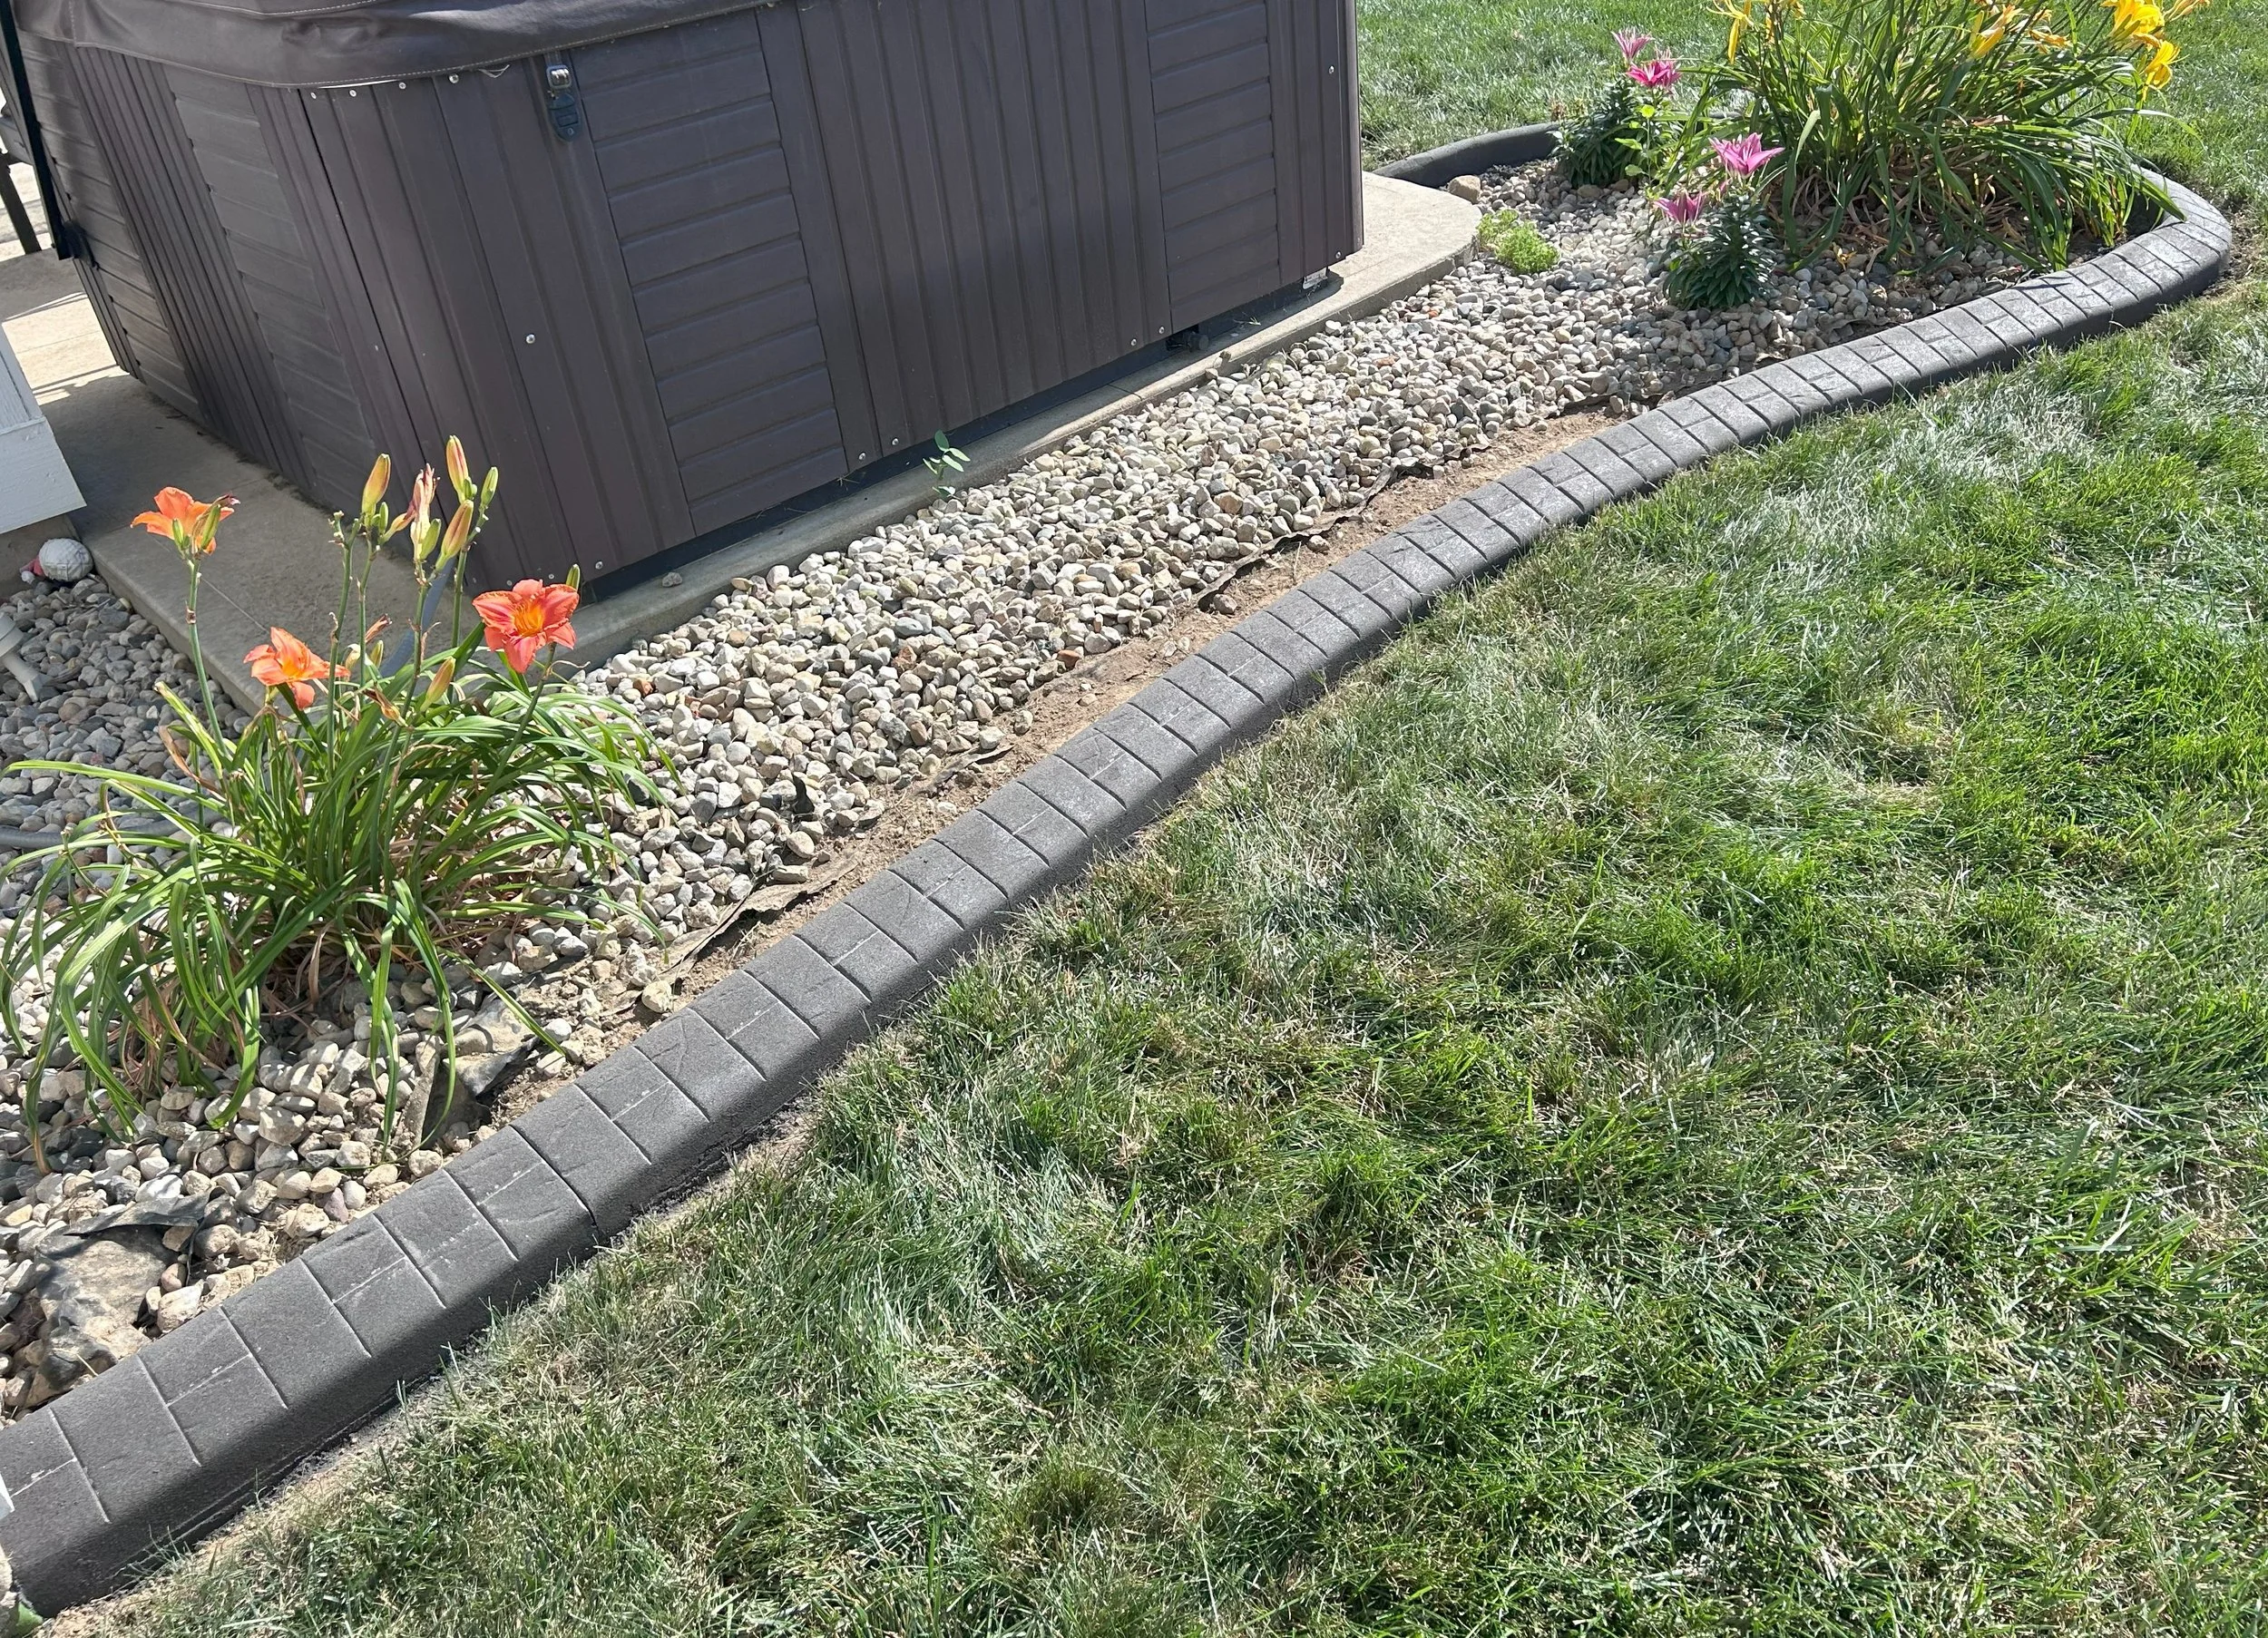
Then comes the stamping—a crucial step that turns functional curbing into a work of art. After carefully troweling the surface smooth for an even base, we roll on a subtle Spanish texture that adds just the right amount of flair without hogging the spotlight. Finally, the H-Stamp pattern is gently pressed in. But here’s the kicker: the concrete can’t be too wet, or the design will blur like a bad selfie, nor too dry, or it won’t leave a mark at all. It’s all about balance, baby—wet enough for a perfect imprint, dry enough for crisp edges. The result? A curb that’s not just sturdy but stylish enough to make your sidewalk jealous.
Step 4: Curing & Cleanup
Once we wrapped up the finishing touches on the curbing, we didn’t just pack up and leave. We sprayed a clear acrylic curing compound over the surface. Think of it as a fancy, invisible raincoat for your concrete—locking in moisture, fending off cracks, and making sure the color cures evenly. Because nobody wants a patchy curb that looks like it forgot to dye its hair evenly.
Now, here’s where you come in, dear homeowner. For the next 48 hours, your new curb deserves a little TLC—no mowing or foot traffic, please! It’s basically the concrete equivalent of a spa day. And for the more cautious among you, hold off on edging near the curb for a full 7 days. Also, resist the urge to water that area for 72 hours; your curb is not a plant, and overwatering won’t make it happier.
Once the curing was underway, our cleanup crew swung into action. We removed all the pesky debris that might have overstayed their welcome. Any spots where the grass got a little roughed up? We raked the sod tight against the curb to keep everything neat and tidy. Finally, we walked through the entire project with the client, handing over a detailed curb care sheet—consider it your curb’s user manual. After all, even the best curbs need a little love to keep looking sharp.
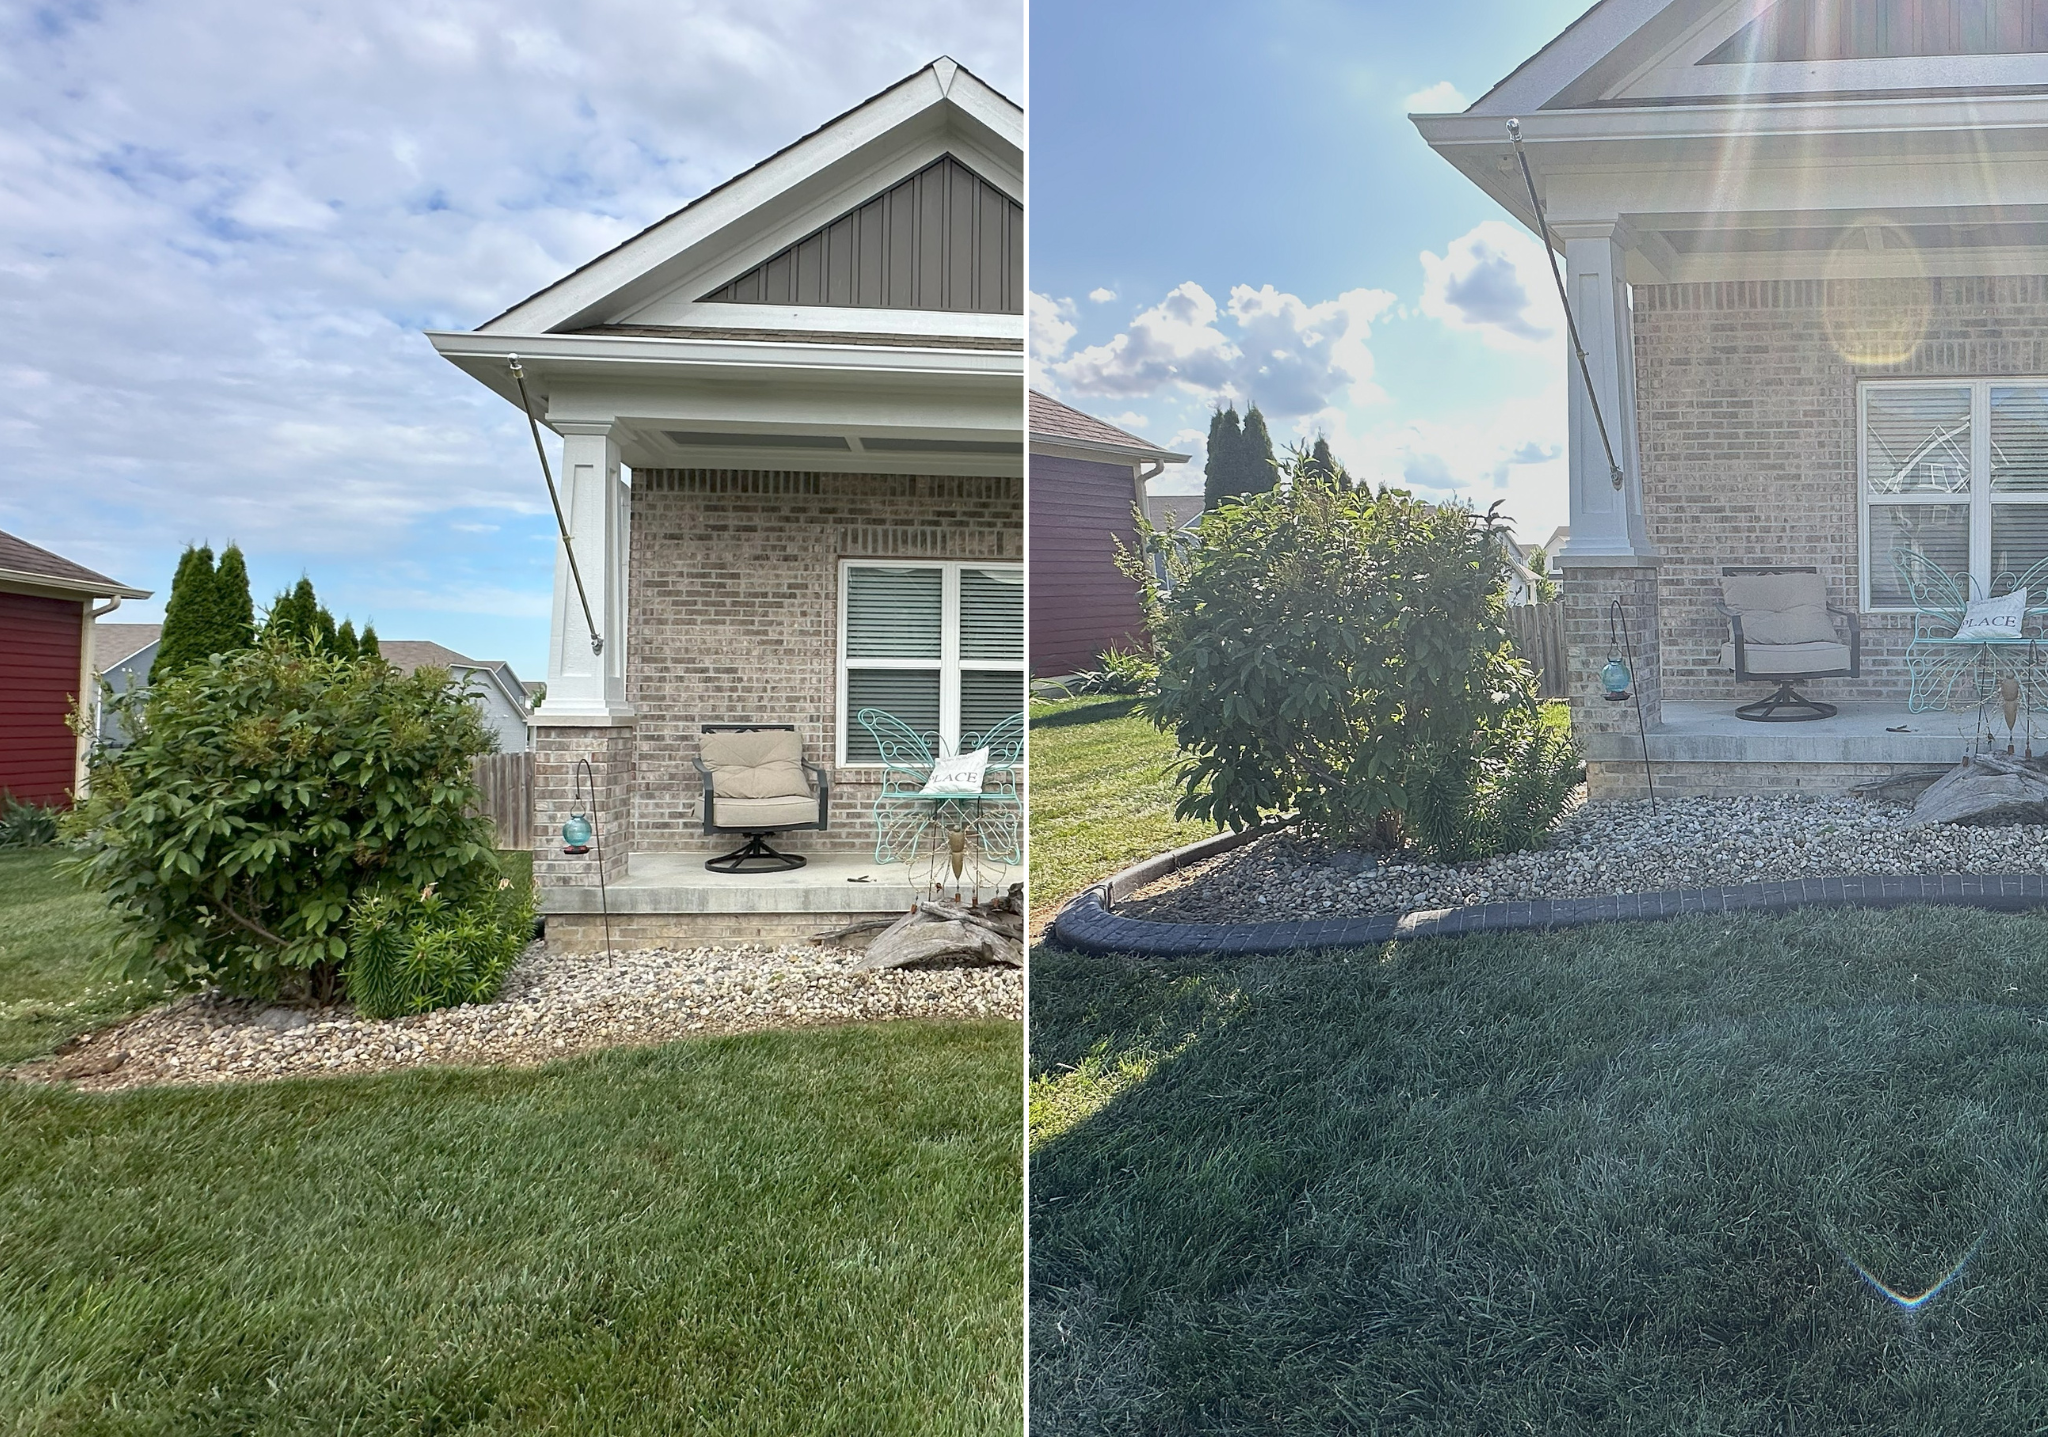
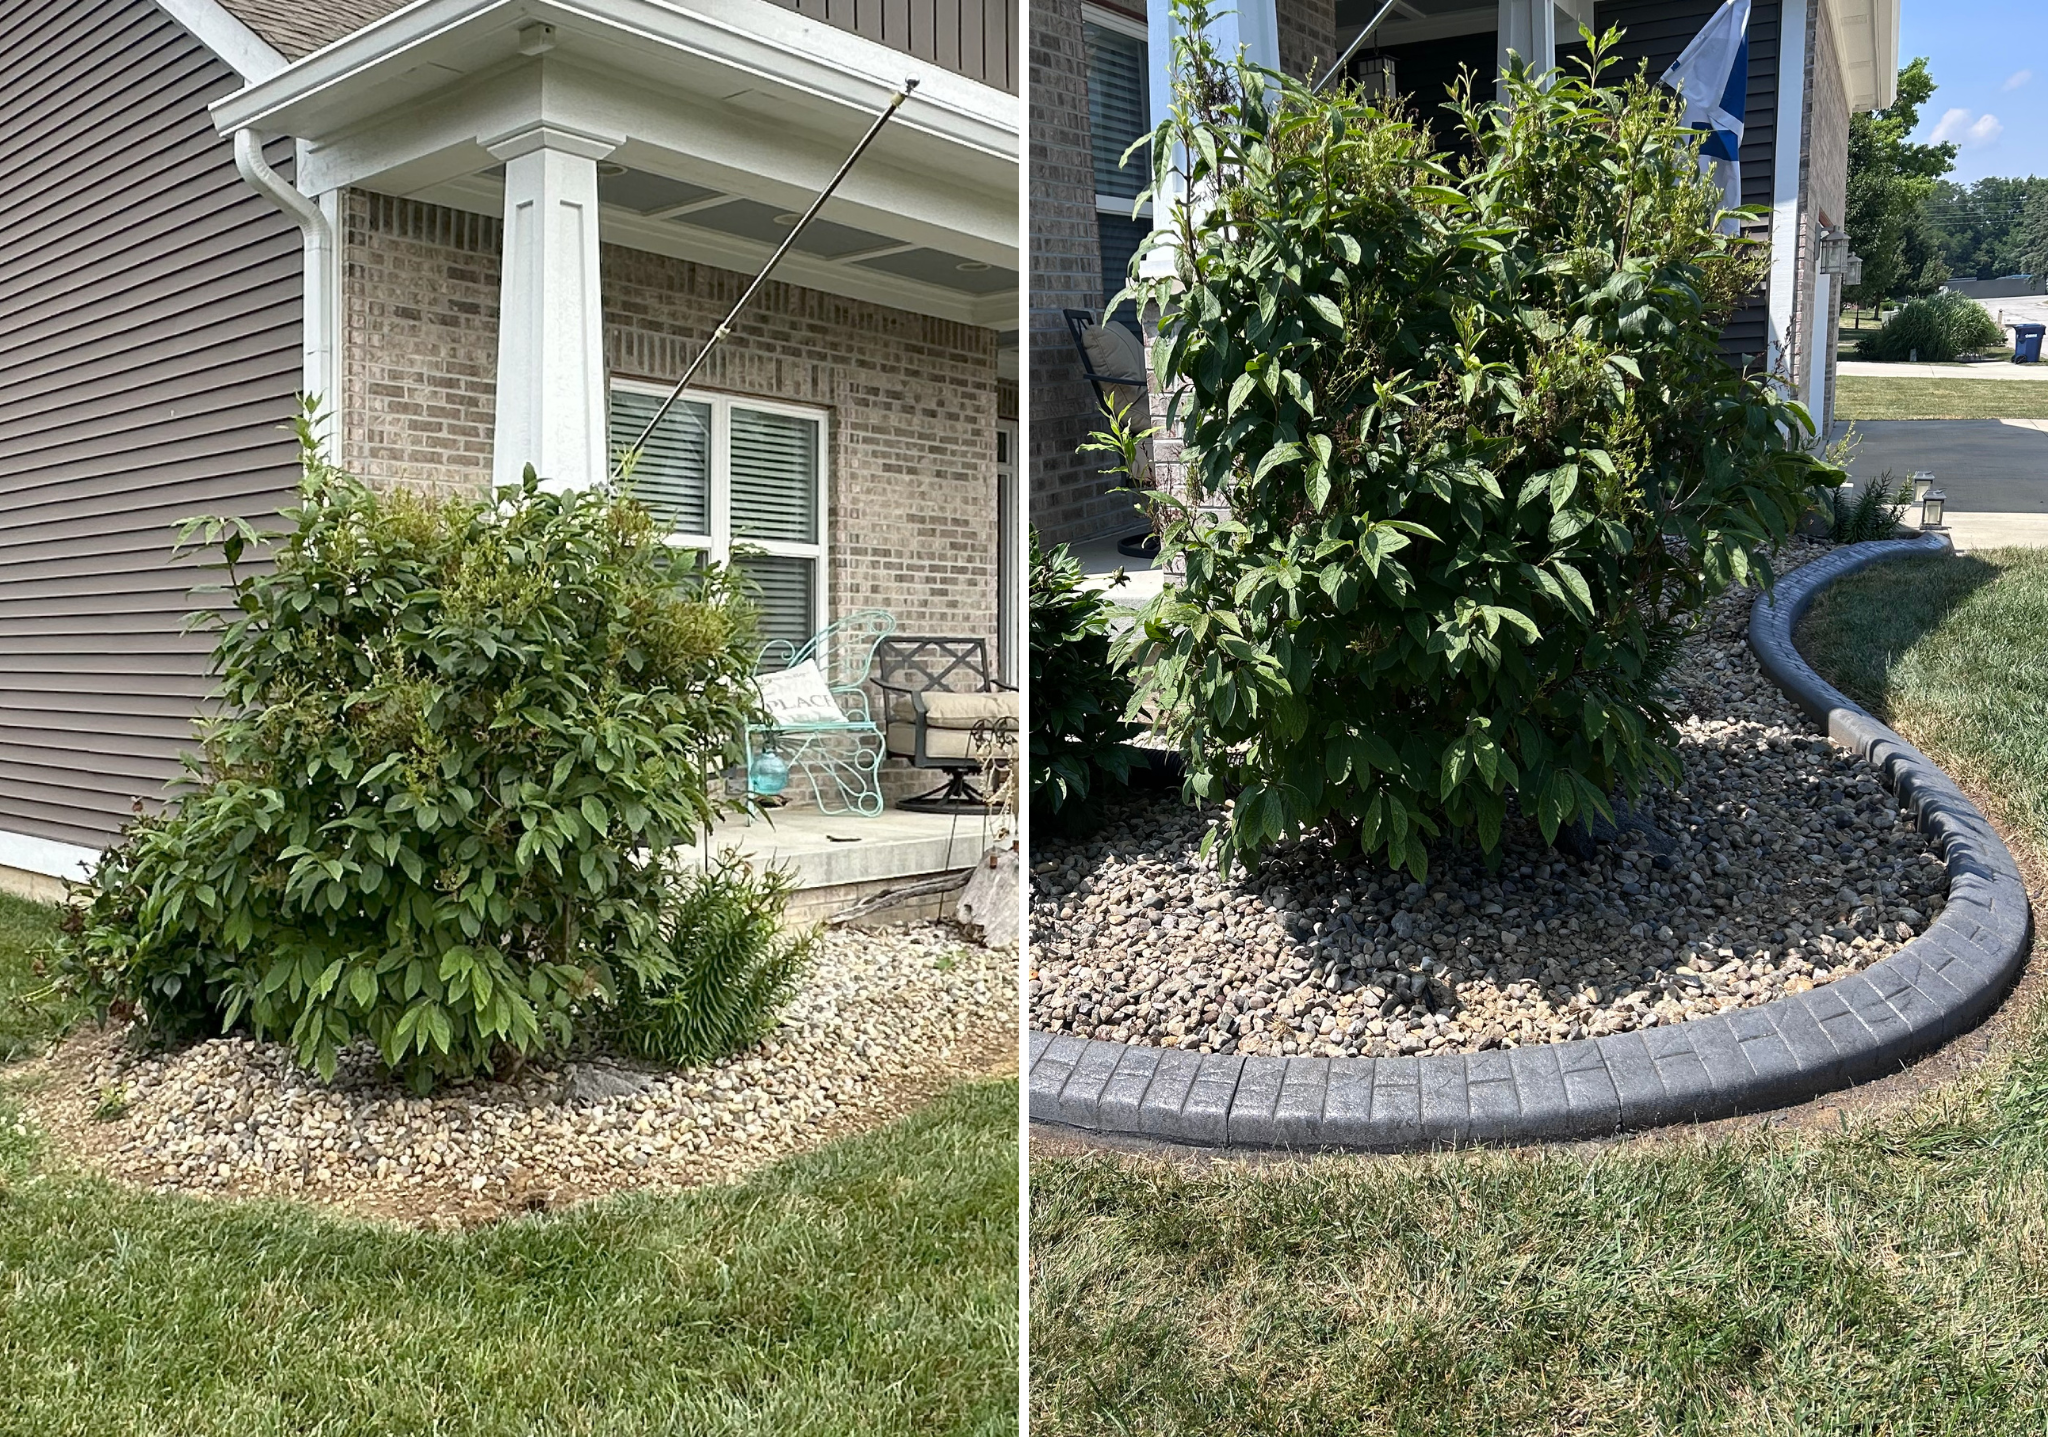
Step 5: Before & After Results
Transforming your yard from a chaotic mess of worn metal edging and rebellious rock beds into a sleek, professional outdoor space is easier than you think. Imagine looking out over 150 feet of seamless Gauntlet Grey-stamped concrete curbing—no more patchy patches or wandering stones daring to invade your lawn. This isn’t just any border; it’s a clean, crisp line that laughs in the face of unruly grass and soil.
Not only does it give your yard a polished, Instagram-worthy edge, but it’s also mower-friendly and practically low-maintenance. You can finally say goodbye to those tedious trips wrestling with metal edging that’s seen better days. Instead, enjoy more time kicking back and less time dealing with landscaping headaches. It’s the kind of transformation that boosts your curb appeal and property value without breaking a sweat—or the bank.
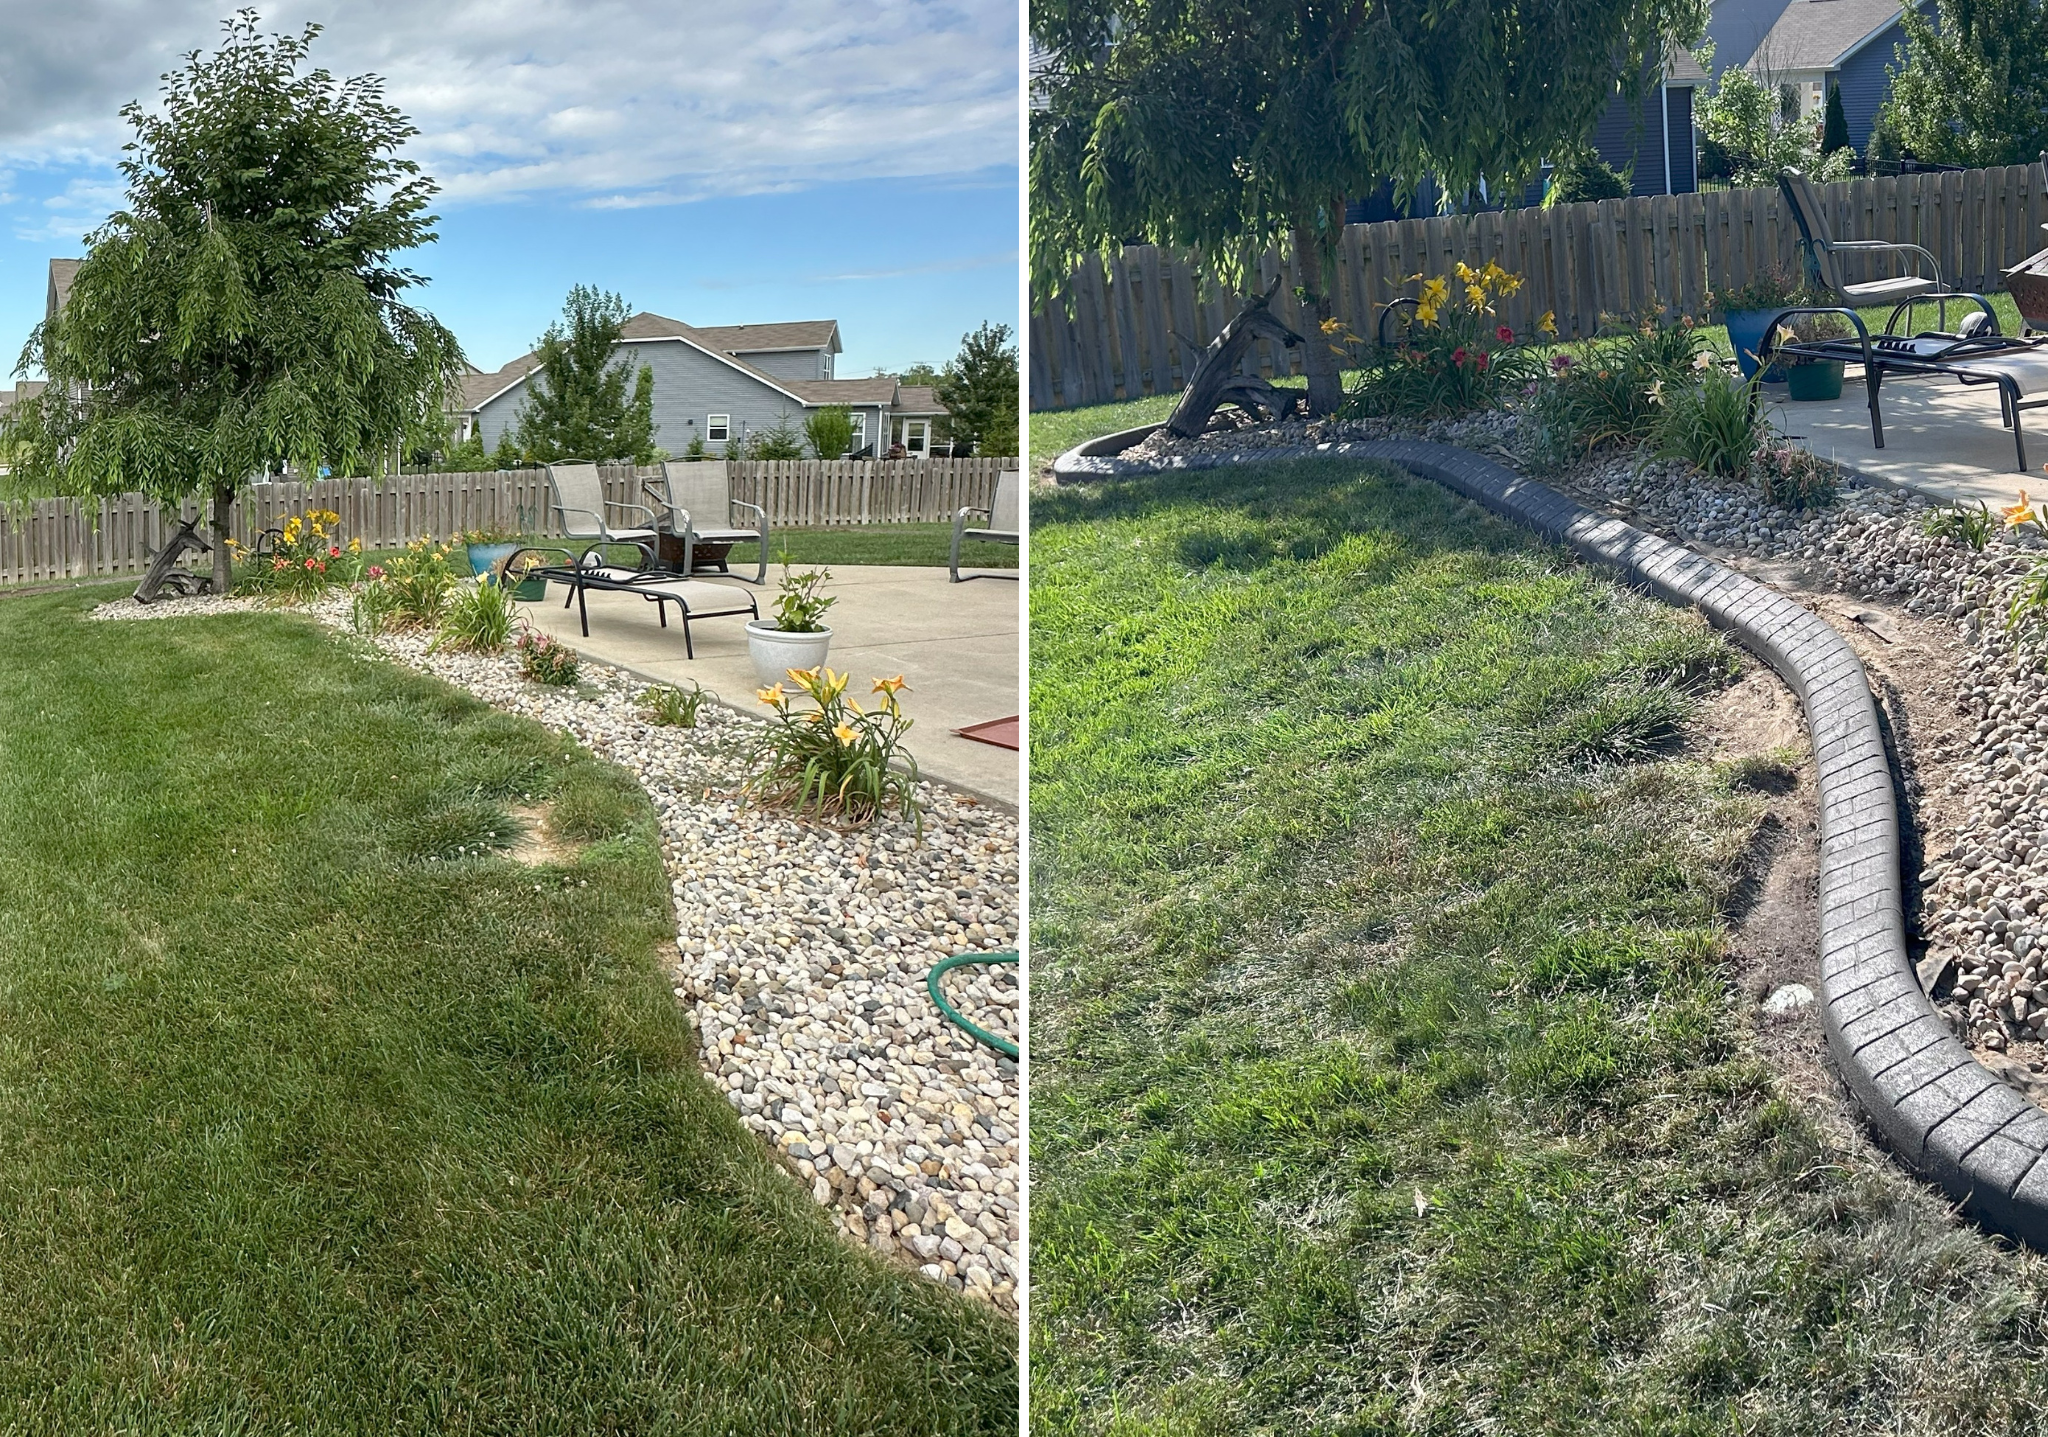
Step 6: Challenges & Solutions
When it comes to installing decorative concrete curbing, not everything goes smoothly—especially when tight curves and blazing heat decide to join the party. Take the challenge of that tight curve in the backyard, for example. The turn was, well, a bit too tight to let the machine do its seamless magic in one go. So, we rolled up our sleeves and did a little extra forming by hand. Sure, it wasn’t as speedy as the machine, but hey, perfection often demands a bit of elbow grease.
Then there’s the heat. While the concrete curbing stood strong against the scorching sun, our team found themselves battling the heat in full force. The secret weapons? Plenty of hydration, liberal applications of sunscreen, and just the right amount of good-natured complaining to keep spirits (and body temperatures) in check. Because let's face it—beautifying your yard is hard work, especially when Mother Nature cranks up the thermostat.
At the end of the day, a little improvisation and a splash of humor go a long way in turning these challenges into success stories—and beautifully curbed outdoor spaces.
Step 7: Key Takeaways from This Job
When it comes to decorative concrete curbing, prep work isn’t just important—it’s everything. Think of layout, grading, and compaction as the unsung heroes of a great job. Skip or skimp on these, and you might as well be building on quicksand. Sure, it sounds a bit dramatic, but quality foundations make all the difference between a masterpiece and a mess.
Now, let's talk mix consistency. This is the moment where a steady hand and a sharp eye earn their keep. Eyeballing pigment or water? That's a rookie move. Get those proportions right, and your concrete will look like it just stepped out of a magazine shoot. Get them wrong, and, well, your curb might start looking like it had a rough night.
Stamping is an art form, too—but it’s not about rushing through acres of concrete like you’re on a mission from the streets. Tackling small sections at a time is the secret sauce for cleaner, crisper results. It's like painting a detailed portrait rather than trying to color a billboard with a crayon—patience counts.
Finally, happy clients are the best clients. And educated clients? Even better. That’s why we never just pack up and leave. Every job ends with a handy tip sheet and crystal-clear expectations. It’s our way of saying, “Here’s how to keep that curb looking sharp, no PhD required.” Because when everyone knows what’s what, everyone’s smiling.
Ready to Upgrade Your Yard?
A one-day installation perfectly showcases what can be achieved when design, planning, and execution align seamlessly. At Border Bros, we transform your outdoor space with decorative concrete curbing that not only enhances curb appeal but also reduces maintenance and increases property value. If you’re ready to elevate your landscape, give us a call at (317) 763-0027 or book your free quote online at www.borderbroscurbing.com.
For those seeking design inspiration, we offer a FREE Curbing Style Guide. It’s filled with a variety of patterns, finishes, and real project photos to help you envision the possibilities for your own property. Let us help you create a stunning outdoor space that stands the test of time.